road

road

Friday, June 29, 2012

Homemade Fruit & Grain Bars

 Fruit & grain bars have somehow become a staple in our kitchen in the last few years. The 5 year old is ADDICTED. This happened when he was 2 and the bars had been a diaper bag grab & go, occasional food. But with rampant morning sickness & fatigue, I wasn't up to making him something most mornings and he didn't eat cereal. What was a sometimes food became his default breakfast and is one of his favorites still.

As I've been re-evaluating our food choices, especially things that come in boxes, I searched high and low for a premade variety of these that would meet my standards (I'm looking for pronouncible ingredients that I can find in my pantry w/o additives or preservatives). Grocery store? NO! Trader Joe's? No. Whole Foods??? Nope. So this became a top priority for me to figure out how to make it at home with out all the unnecessary stuff. Unfortunately, after several recipe searches, I came up dry. Lots of press & form, cut bars but nothing that looked or had the texture of a "real" fruit/grain bar.

I decided that I would try to make my own recipe- not really something that I've ever done. Typically, I just customize other people's recipes. This time I really had to start from scratch. For my approach, I looked a lot at what went into making homemade fig newtons because they seemed the most similar in structure. Of course we can't have fig newtons for breakfast (at least not every day...) so I had to figure out how to make it healthy enough to be a reasonable meal or snack. After around 3 months of test batches and adjustments, I think I've gotten it!

I'm really pleased at the nutrition of these bars-- they've got whole wheat, whole oats and flax seeds, so they provide a nice amount of fiber, whole grains and omega-3's. Using a rough online calorie calculator it shows about 200 calories per bar.

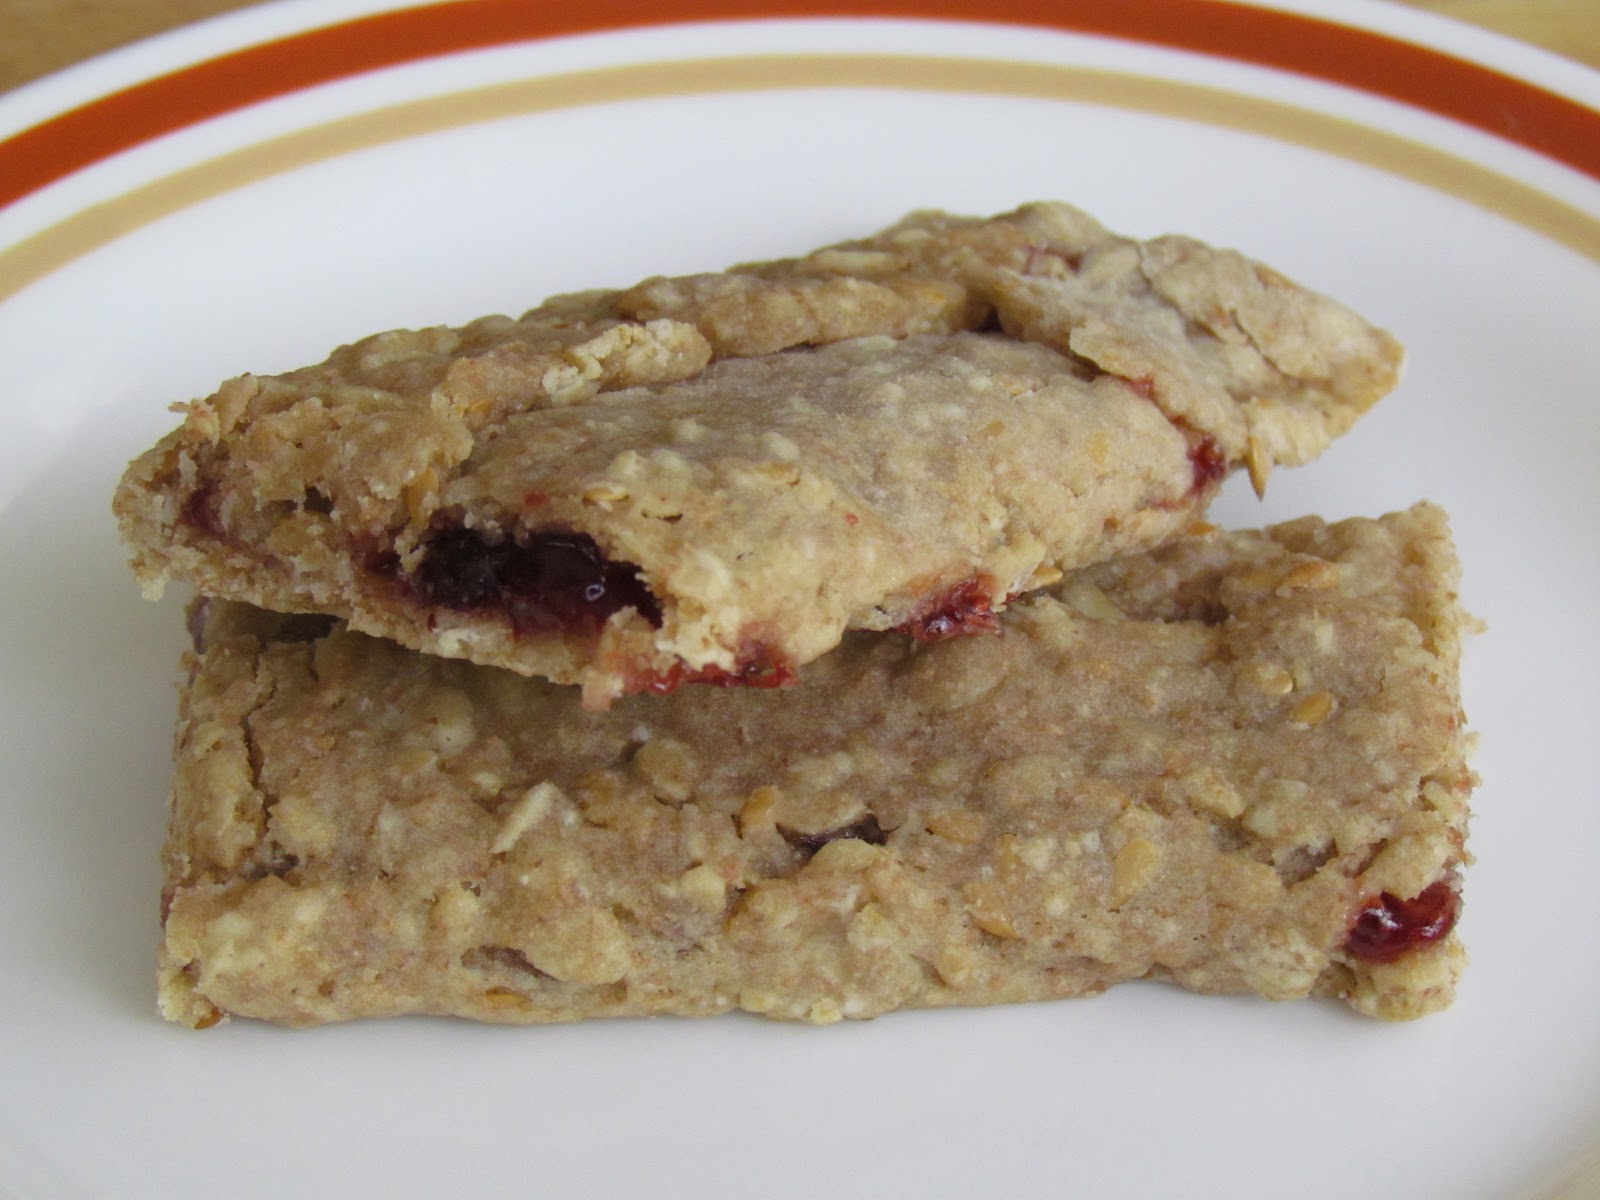
Even better than the nutrition is the taste and texture. They have the soft yielding crust of a prepackaged bar with a little extra crunch from the flax seeds & oats. By using almond extract, instead of vanilla, it adds just a little bit of that baked goods type flavor. We've tried this with mixed berry jams, strawberry, blackberry and raspberry so far, and they've all been excellent! Its nice to finally have something that not only smells good but tastes pretty darn good, too!

Cost wise, if you use a  "select" jam (the kind I like has only fruit, sugar & pectin) it comes out pretty similar to buying them from the store. However, if you really want to make this a cheap project, use your own homemade jam!


Recipe: Fruit & Grain Bars (12 bars)

1/2 cup brown sugar
1/3 cup softened butter
1 egg
1/2 tsp almond extract
1/2 cup whole wheat flour
1/2 cup all purpose flour
3/4 cup rolled oats (old fashioned or quick cook)
1/4 cup flax seeds
6-8 oz fruit jam (look for ones without corn syrup)

1) In a large mixing bowl, cream butter and sugar.
2) Add in egg & extract and beat for 1 minute.
3) In a separate bowl mix remaining dry ingredients.
4) Slowly add dry ingredients to wet, beat until well mixed. Dough will be very sticky!
5) Refrigerate covered dough for 1 hour (you can leave in fridge overnight, just leave out on counter 10-15 minutes to soften up)
6) Divide dough into 2 equal portions.
7) Roll one dough portion out on floured surface to 1/8" thick (think pie crust or thinner). You should have a rough rectangle 10 x 12" long.


8) Cut rectange in half (lengthwise) and transfer 1 portion of dough to cookie sheet covered with silicone mat or parchment paper. Fix any rips or holes in dough. Reshape as necessary.

9) Spoon 1-1 1/2 Tbs jam down center of dough strip.

10) Fold 1/3 of dough over jam, fold opposite 1/3 of dough over other fold.  Pinch seam to seal. Pinch ends to seal.  Finished bar should be 1- 1 1/2" wide and approx 12" long. Narrower is better. Make sure bars have the final appearance you desire. Repair any jam leaks!


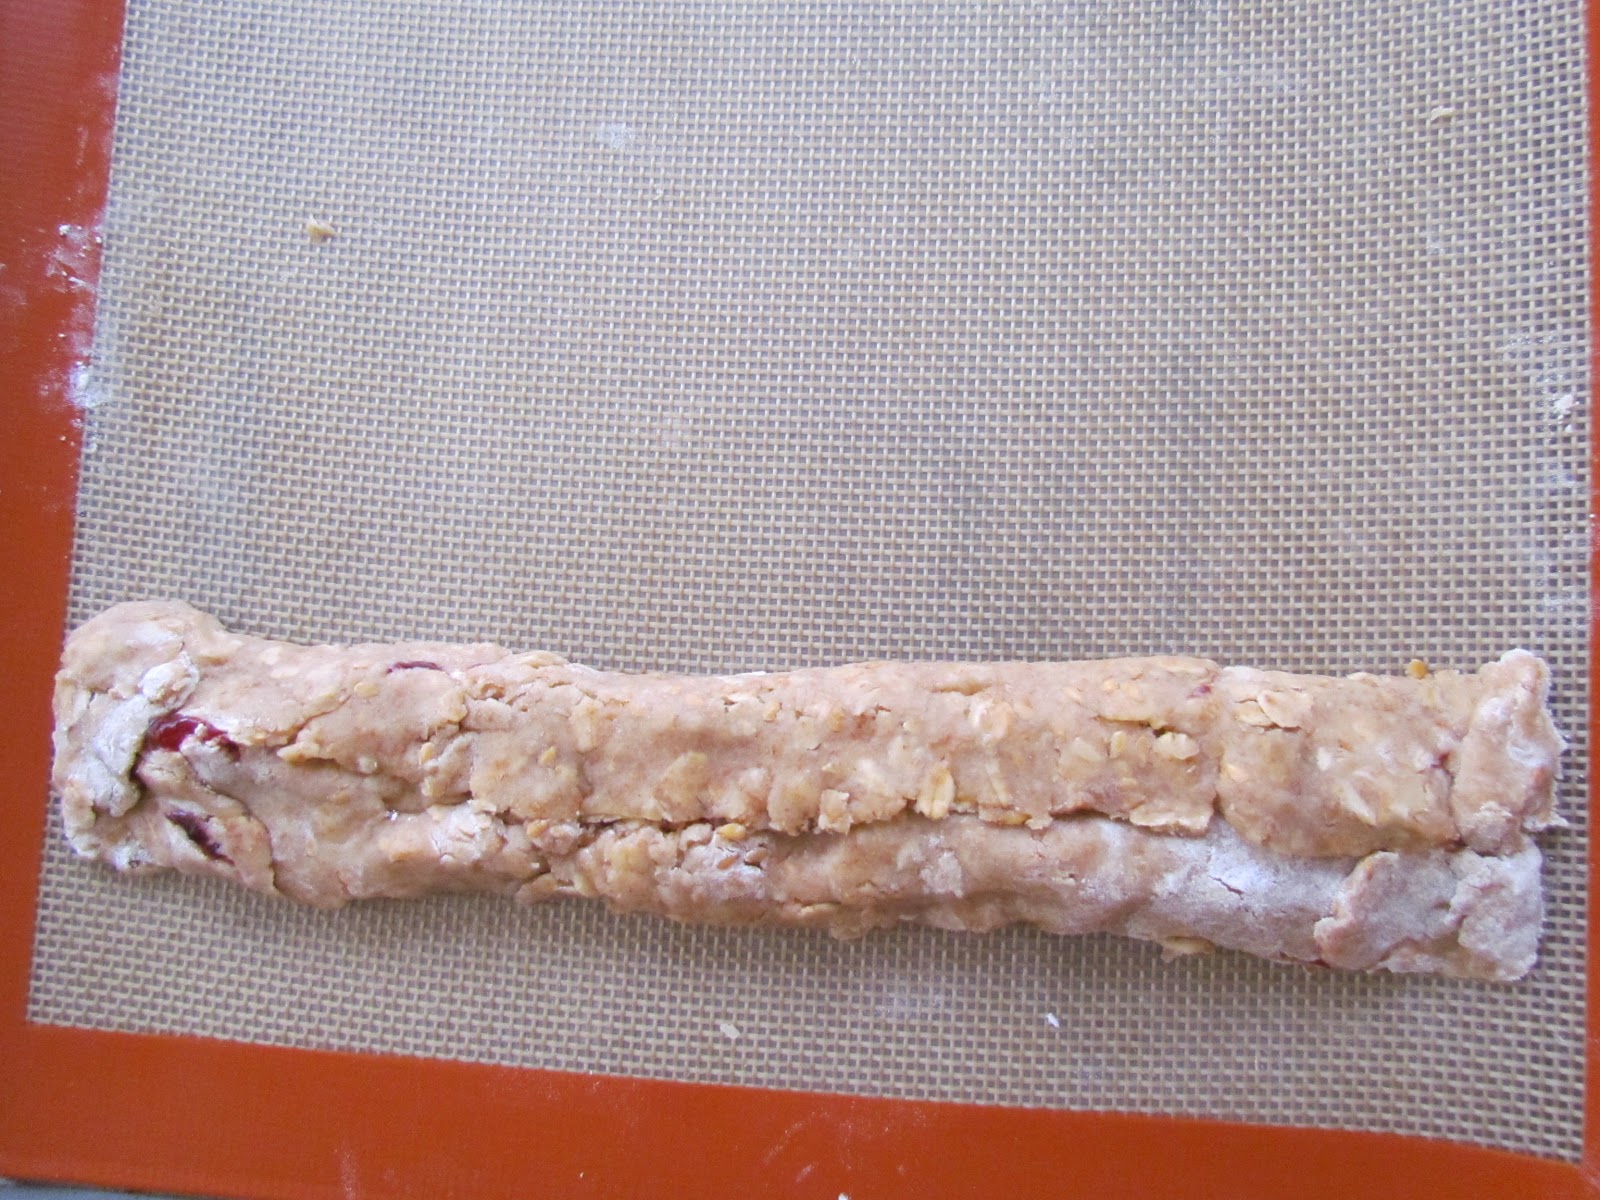
11) Complete steps 8-10 for other half of rolled dough and repeat steps 7-10 for other unrolled dough portion. You should have 4 bars approximately 1 1/2" x 12" on your baking sheet.


12) Bake @ 350 F for 10 minutes. These do not brown much. If you overcook, the jam will melt out!
13) Let cool completely on cookie sheet.
14) Cut each long bar into 3 equal bars approximately 4" long.
15) Store bars in airtight container in refrigerator for up to 2 weeks. (We actually had the last batch for a little over 2 weeks and I ate the 2nd to the last one- while ever so slightly crumbier than a super fresh one, it seemed none the worse for wear!)


 If you give this recipe a try, comment below and let me know how it worked for you!


Wednesday, June 27, 2012

Taco-sagna!!!

Okay, I totally made that up! I got the idea for this dish from a recipe for vegetarian enchiladas from a Sunset magazine years ago. The original recipe called for making individual mini-casseroles but that was TOO much work!! I made a few adjustments to the recipe, including making it as one big casserole. The assembly process for this dish reminded me of making a lasagna but with Mexican themed ingredients-- and TACO-SAGNA was born!

This dish is really versatile-- it can be made primarily with pantry items (canned beans, sauce, etc) for an easy midweek dinner, it is completely vegetarian (if you make sure your refried beans are vegetarian) OR you can make everything fresh and have a great whole-foods dinner filled with healthy & nutritious veggies, legumes & whole grains (masa used to make corn tortillas is considered whole grain- did ya know?)

If you're looking for a dish to try out "meatless mondays" or take to a potluck that has vegetarians in attendance, this is a perfect dish-- I guarantee you won't miss the meat at all!


Taco-sagna

Ingredients:
12 corn tortillas
1 15 oz can tomato sauce (or 2 cups homemade)
1 packet taco seasoning mix (or 2 Tbs homemade-I like this recipe)
1 16 oz can refried beans (or 2 cups homemade) I like the lowfat refried black beans
1 16 oz can pinto or black beans (or 2 cups homemade)
1 16 oz can corn kernels (or 2 cups frozen)
10-16 oz fresh steamed/wilted baby spinach leaves (drained, squeezed & chopped-- can sub frozen)
1-2 cups shredded cheese (Cheddar, monterrey jack work well)

Optional:
1 2.25 oz can sliced black olives
Sour cream
Chives


Directions:

1) Pour tomato sauce into small bowl, mix in taco seasoning, set aside.
2) Cut tortillas in half.

3) Place 8 tortilla halves over bottom of 9x13 baking dish/casserole. Placement isn't particularly important, just try to mostly cover the bottom of the dish.

4) Spoon 1/3 of sauce over tortillas.

5) Spread refried beans over tortilla layer.

6) Add pinto beans.

7) Place 8 tortilla halves over bean filling layer. Again, try to basically cover the bottom.

8) Spoon next 1/3 of sauce over tortillas.

9) Evenly spread corn kernels over tortilla layer.

10) Using your fingers pinch apart spinach into small evenly distributed clumps.

11) Place last 8 tortilla halves over spinach/corn layer.

12) Spoon last 1/3 of sauce over tortillas.

13) Sprinkle 1-2 cups of shredded cheese over the top

14) Top with sliced olives (if desired)

15) COVER with aluminum foil and bake at 375 for 20 minutes. Remove foil and bake for an additional 10 minutes.
16) Casserole is done when cheese is melted and edges are bubbly. Makes approx. 8 servings.

Serving suggestion: Top taco-sagna squares with a dollop of sour cream and some chopped chives.

Final Note: As well as being able to freeze this entire casserole uncooked, the cooked leftovers will also freeze & reheat beautifully!! This week is a bit of a freezer refill week. Yesterday, I made a big batch of freezer burritos for hubby and myself and today I made one taco-sagna for dinner and one for the freezer. I'm trying to take my own advice from Sunday's tip!!


Tuesday, June 26, 2012

DIY Dishwasher Detergent

As we've been trying to increase the quality of items we put into our bodies, it seems a natural extension of that to also consider the chemicals we surround ourselves with in the home.

I have a cupboard full of cleaners: sprays, powders, wipes & detergents. I have slowly been replacing some of the ones I knew had a lot of chemicals with greener products-- I've especially become fond of products by Greenworks & Method.

But as good as they are, I still don't know exactly what is in them & how safe they REALLY are. I also have a few tough cleaning problems to deal with-- mostly related to extremely hard water. I was finding mineral build up in the shower head, tub drains, drinking glasses, & even the water dispenser in the door of the fridge. Some of these things needed to be cleaned with something I KNEW would be safe around food & children-- the answer??? VINEGAR!!  Plain, old ordinary white distilled vinegar! You can buy it by the gallon for about $2.50. You can use it straight (I dip a sponge or paper towel in it and swipe hard water stains) or dilute (mix 50/50 with water in a sprayer for general clean up).

I had such great results with this that I started asking myself, what else can I make?? It turns out that with a few simple ingredients, you can make a wide variety of cleaners for the floor, counters, bathroom, windows, even laundry detergent! 

I decided to try making my own dishwasher detergent first for a few reasons- cost is certainly one of them, as is greener cleaning, but honestly I just hate my dishwasher detergent. I've used Cascade all my life with generally good results but with the major detergent reformulation a few years ago, nothing seems to clean like it used to. I haven't found a brand that works better than "okay". I am currently using Cascade lemon liquid with adequate results-- most dishes come clean but anything caked on usually needs a separate scrub-- forget those commercials with the crusty lasagna dish! 


Dry Dishwasher Detergent:

1 cup Borax
1 cup Washing Soda
1/2 cup non-iodized (kosher) salt
1/2 cup citric acid


You can get Borax & Washing soda in the cleaning or laundry aisle at stores like Walmart. I paid $3.38 for the big box of Borax & $2.24 for the big box of washing soda. Borax is a mined mineral and has been used as a household cleaner for over a century-- I actually visited the main Borax mines which are about an hour or so from my city while chaperoning a field trip with a high school chemistry class. Washing soda is NOT the same as baking soda but it is made from baking soda and is a similar chemical. These big boxes also form the basis of other cleaners like laundry detergent.

The standard salt cylinder sized container of kosher salt cost .59 and the citric acid was the priciest at $1.99 for a measly 6 oz. The citric acid was the hardest to locate, I found it in the ethnic foods/spice section of a more ethnic grocery store. You can substitute Lemishine, which is mainly citric acid & salt for this and its found in most Walmarts, next to the dishwashing detergents.

To make the detergent:
Add all the dry ingredients to a 4 cup container with a tight fitting lid (I used a cleaned, recycled yogurt container). Mix well. If you aren't using it regularly, be sure to stir occasionally to prevent caking. Don't forget to label-- its not just for organizing but for safety!!


To use the detergent:
I've found that 2 tbs in the main wash and 2 tbs in the prewash (basically filling the compartments) works pretty well.

For best results:  FILL YOUR RINSE AGENT DISPENSER WITH VINEGAR  (you can even do this if you don't make your own detergent) you will get a great, chemical free, spot free finish!!

Final Thoughts: I've run a few loads of dishes and I'm finding that the homemade detergent is performing about the same as the store bought with one exception-- I have these white plastic cutting boards I use for food prep and the staining that normally comes out in the wash isn't. I might have to resign myself to doing a little bit of extra scrubbing on this one item but everything else seems spic and span! I'm also very happy about the cost. Because you have so many ingredients left over, the cost per batch is a little over $1. Big savings from $4 a bottle at the store!

Have you tried this?? How were your results?? Comment below!!

Sunday, June 24, 2012

Sunday Savings Tip: Less time = less money!

When I actually calculated what it would cost to replace me and all the jobs I do here at home, the amount I came up with caused me to increase my personal life insurance! Whether you are paid for your work (inside OR outside the home) or not, your time is worth money. So, the less time spent on any particular job, the better!  

Right now, with our healthy eating program, I'm spending a majority of my "work" time in the kitchen. Cooking, cleaning & prep work has taken over the bulk of my to-do list! To try to cut that down, I've been skimming the internet for new recipes & techniques. In my research, I keep coming across one MAJOR time saving idea--This is something so simple, yet so revolutionary: 

Prep/cook once, eat twice (or 3 or 4 times!)


So, this is something I've been trying to do more of. I like cooking, but not everyday. Some days I'm just plain tuckered out. I'm thinking: Wouldn't it be nice if all I had to do was throw something in the microwave or oven??

I've always made a little extra in most of our meals for Hubby to take as a lunch but this is a more deliberate increase in volume. I'm specifically setting out to make a full extra dinner portion for the whole family. If you're gonna be cooking anyways....


Some ideas I've been trying:  freezing whole portions of soup in large tupperware containers or gallon ziptop baggies. Prepping/assembling casseroles or pasta dishes in disposable aluminum trays. I've also found that doughs also freeze well, wrapped in wax paper & stored in a large ziptop baggie- this is AWESOME for cookie doughs. (If you rolled it into logs before freezing-- you'll have your own slice & bake varieties!) 

What if I don't have enough for 2 complete meals? I've also been freezing individual components like prepped veggies. What a time saver to have something difficult (like butternut squash) already peeled & diced! I've also found that you can also freeze fruits but they tend to mush up when defrosting so this is best for ingredients that will eventually be mashed, pureed, made into a smoothy, etc.

Any other freezing tips I've left out? Comment below!!


Friday, June 22, 2012

Veggie Variety: Parmesan Roasted Green Beans

I've always loved green beans, especially at Thanksgiving when Grandma would let them simmer in her big cast iron pot on the back of the stove ALL DAY with some onion & bacon. Tender, succulent and with a hint of smokiness, they basically dissolved in your mouth.

I've never gotten similar results cooking them myself and everyone keeps telling us that we really aren't supposed to cook our veggies until they are mush. I've had a bit of a phobia of other people's green beans because they are often much, much too al dente for me. I've been working on cooking veggies (and in particular green beans) less, to better preserve the nutrients & flavor. This recipe is flexible because it will taste great whether you like them on the crunchier side or softer side-- you're the boss!!


Recipe: Parmesan Roasted Green Beans


Ingredients:

3/4 lb fresh green beans, washed & ends trimmed
1 tbs olive oil
salt & pepper to taste
1/4 cup shredded parmesan cheese

1). Drop beans into a gallon size baggie (I either use the cheapie kind that requires a twist tie OR reuse the veggie bag from the store). Pour olive oil into baggie, shake to combine.
2) Pour oiled beans onto parchment covered baking sheet or glass baking pan.
3) Sprinkle with salt & freshly ground black pepper, toss with shredded parmesan.
4) Bake at 375 F. Check at 30 minutes for al dente, 40 or so for softer.


Tuesday, June 19, 2012

Veggie Variety: Cauliflower Baked "Potato"

Getting more fruits, veggies and whole grains in your family's diet requires both the willingness to try new veggies (we're giving bok choy and brussel sprouts a try!) and looking for new ways to cook old favorites.

One of my longtime favorites is cauliflower. I love cauliflower! It doesn't get the positive press that broccoli does but I really enjoy its milder flavor and less "woody" texture.


One of the easiest ways to get in an extra serving of veggies is to swap cauliflower for your starch. You can use it almost any place you'd use rice or potatoes. You'll get the feeling of having a white starch but all the vitamins and fiber of a vegetable! 

Start with 1 head of cauliflower (or a package of frozen florets). Cut florets from the large center stem and boil in water or steam until soft (approx 15-20 min.) Strain in collander over sink. While draining, press excess water out of cauliflower with potato masher or wooden spoon. Getting most of the water out is KEY to a great texture!

  • Mashed "potatoes" : Pop cooked, drained & pressed cauliflower into food processor, puree until smooth. Add cream/milk, butter & salt/pepper as usual. You'll get a great mashed potato texture & creamy flavor!
  • Cauliflower "rice": spread cooked, drained & pressed cauliflower onto cutting board, chop finely with knife until texture resembles rice, use anywhere you would white rice!
For something decadent, especially if you have some avowed cauliflower HATERS, you have to try the following recipe. It looks, tastes and has the texture of your favorite steakhouse big baked potato with all the trimmings!

Cauliflower Baked "Potato"


Ingredients: (serves 4, multiply as needed)
1 head of cauliflower, prepared as above
4 oz cream cheese or neufchatel
4 oz sour cream
1 cup shredded cheese (sharp or medium cheddar works well but for something really awesome, try a SMOKED cheese)


1. Take cooked, drained & pressed cauliflower and continue mashing with potato masher or large fork. Break it up into fairly small chunks but it doesn't have to be perfect-- you are going for a rustic, baked potato type of texture here.
2. Put prepared cauliflower into a 1-2 quart casserole dish that has a lid.
3. Using your fingers, pinch off small pieces of the cream cheese and drop into casserole. Mix together when done.
4. Mix in sour cream, shredded cheese & salt/pepper to taste.
5. Bake covered in 350 F. oven for 20 minutes and then uncovered for another 10.
6. Casserole is done when lightly browned and bubbly at edges.


To take this up a notch, try topping with crumbled, cooked bacon and diced green onion!

Comment below and let me know how this worked out for you....


This recipe is adapted from this post.


Monday, June 18, 2012

DIY Cooking Basics: Balsamic Vinegrette

For a quick, easy & healthy dinner, nothing beats a salad. As the heat begins to turn up in summer, this is especially true! It seems like everyone is looking for something light and refreshing, full of the bounty of colorful seasonal produce that is peaking this time of year. It also doesn't hurt that salads typically require very little (if any) actual cooking!  

One of the ways that a beautiful, fresh salad can be ruined the fastest is by having someone drown the whole thing in a processed, store bought dressing. They are typically full of preservatives, additives, excess sodium and sugar. The flavor often leaves a lot to be desired as well. Making your own dressing is simple, inexpensive and just about guarantees a rave review!

My Favorite Summer Salad: Strawberry Grilled Chicken Salad!

  • Bed of mixed baby greens or baby spinach leaves
  • grilled chicken breasts, chopped
  • crumbled feta
  • candied walnuts (in the popcorn or baking aisle)
  • sliced, hulled fresh strawberries
  • Homemade balsamic vinegrette (see recipe below)


Balsamic Vinegrette  (per person, multiply as necessary)
  • 1 Tbs (15g) light flavored Olive or Canola Oil
  • 1 Tbs (15g) balsamic vinegar
  • 1 tsp (5g) dijon mustard
  • 1/2 Tbs (10g) honey (if you like tangy, reduce or skip this)

  • If you have a food scale, put 16 oz measuring cup on scale and zero out. Add each ingredient by weight, zero between items.
    • If no scale, use volume measurements. Add all ingredients
  • Whisk & serve immediately
  • Extra can be stored in closed container in refrigerator. Use within week. Shake before using!


A Few Other Salad Ideas To Try:
  • Mexican: Romaine, grilled corn, black beans, cotija cheese crumbles, crunchy tortilla strips, cilantro & a nice grilled tri tip all topped off with a spicy salsa
  • Italian: Iceberg, tomatoes, red onion, pepperocini, seasoned croutons, sliced pepperoni or salami, a sprinkling of shredded parmesan dressed with a tangy vinegrette
  • Chinese Chicken: Shredded cabbage, shredded carrots, mandarin orange segments, crispy wonton strips, soft poached chicken pieces topped with a ginger sesame vinegrette
  • Japanese: Romaine, edamame, toasted sesame seeds, seared ahi tuna and a spicy wasabi ginger vinegrette
  • Buffalo Chicken: grilled chicken marinated with buffalo sauce (try Frank's red hot!), iceberg lettuce, tomato, butter toasted croutons all topped with a creamy blue cheese dressing.

What's in your favorite salad? Comment below!!

Sunday, June 17, 2012

Sunday Savings Tip: Bananas

If you are anything like me, you compulsively buy bananas at the grocery store. Sometimes the little dudes will gobble them up in a few short days, sometimes even the hubby packs a few for his lunch. And then sometimes you get to the end of the week and end up with something that looks like this:


Its kind of embarrassing. I hate throwing away food but they are just too mushy to be good for out of hand eating. However, they are GREAT for baking, smoothies and in babyfood (see this post). But by the end of the week (when I'm stuck with all these brown & spotted bananas) I might be too busy, tired or just not in the mood for banana things.  Simple solution: FREEZE them. That's right, they freeze beeeauuuuutifully! Just pop off the peels and any bruises, halve or slice and drop them in a baggie.


They'll work well in any recipe calling for mushed bananas AND you save yourself from wasting food/money plus you'll always have perfectly overripe bananas on hand! As a nice bonus, if you use them straight from the freezer in a smoothie, the result will be a cold and creamy treat closer to a milk shake than a drink!

Friday, June 15, 2012

DIY Done in 10: Basic Compost Bin


As we've embarked on this whole eat more fruits and veggies thing, we've been generating a LOT of green waste-- peels, tops, stems, cores, wilted leaves and the like. Our city waste management company is reasonably modern and provides a free waste can for yard & green scraps. The company then composts this and either uses it on city property or sells it.

It seems to me that it's kind of silly to keep dumping things into the green bin and then turn around and head to the fix-it store to get a big bag of compost or mulch. So, I'm cutting them off! Its my scraps and I'm gonna keep them! So there.

For this project, I was inspired by this post on pinterest.  I also found this list on compostable items very helpful as well!

Materials:

  • 1 very large rubbermaid (or like) tote with tight fitting lid (I used a 30 gal.)
  • 1 drill w/ a 1/2 inch bit
  • shredded newspaper or dry leaves
  • soil (1-2 cubic feet-- I started with 1.5 but may add more as needed to mix w/scraps)
  • scrap bucket for the kitchen (with tight fitting lid if you aren't gonna dump daily)

Instructions:

1. Drill 15 or so holes in the top AND bottom of your tote:


2. Fill bottom of tote with a good few inches of dry leaves or shredded newspaper

3. Add a layer of soil (to approx 1/3 to 1/2 of total depth)


4. Moisten w/garden hose

5. Add compostables, stir, place cover and wait!!

6. Repeat step 4 & 5 as needed to keep soil moist (but not wet or swampy!!)

7. Keep compost bin in shady corner of yard.


Project Analysis:(Out of 4)

Cost: $$$$     Satisfaction: :):):)    Quality: ***       Green Factor: ^^^^

Total cost of materials (tote, soil, scrap bucket for kitchen) was about $15 a similar volume premade one had $99 as its lowest price. So big savings!! An easy 10 minute project that saves over $80 is always a winner, plus I get to reap the "rewards" of our increased green waste. And, I'll get the satisfaction of knowing exactly what went into the compost that will (eventually) be used on our edibles in the garden.

Have you ever made your own compost bin this way? Comment below and let me know how your project turned out!

Wednesday, June 13, 2012

Veggie Variety: Grilled Artichokes

As a Mom, a lot of what I do is food based-- buying food, preparing food, serving food, etc. When you add in an effort to try to get the family to eat more whole foods-- fruits, veggies and whole grains, you also have to add in a LOT of recipe research as well! 

I've been following several blogs, skimming pinterest and checking in with my facebook recipe group to get new ideas for familiar healthy foods or how to instructions for preparing foods that are completely new to me. I thought I'd return the favor with this family summer favorite-- grilled artichokes.  This is a great, kid friendly appetizer or side dish. Kids love it because they get to 1) disassemble something, 2) eat with their hands & 3) use dip!

      • Completely unnecessary side story: at the Little Miss pageant my Mom misguidedly entered me into when I was about 7 (long, long before things went nutty like on toddlers & tiaras), we were asked what our favorite food was -- all the other girls said normal things like pizza, spaghetti, burgers, etc. Not me, I said artichokes! Needless to say, I did NOT win.

Choosing An Artichoke:

  • find one that has a good weight, unwilted leaves, and less purple streaks near the base: artichokes get more and more purple as they get close to blooming and that means less edible parts. Expect to pay $1-3 apiece. (Yikes, I know!! But its better than spending $8 at a restaurant!)

Prepping Your Artichoke:

  • cut off stem close to the base. You can discard (or pare off tough exterior and cook with the rest)
  • if its particularly prickly, you can also cut off the top 1-2 inches of the pointy end (although I rarely bother and its usually not a problem)
  • cut in half lengthwise
  • use a large metal spoon to scoop out  and discard the thistly part (the choke of artichokes) and any purple leaves. This is NOT edible. Don't worry if you don't get it all, you can tidy up after cooking.

Pre-cooking Your Artichoke:

  • Drop your artichoke halves into a large pot of boiling water. Cover & keep at a low/medium boil for about 20 minutes. Artichokes are ready when a knife will slide into the base near the stem with a slight resistance (you don't want them too soft or they will disintegrate on the grill)

Prepare your Marinade:

  • For 2 artichokes (4 halves), mix together 1/4 cup olive oil, 2 tsp crushed garlic (about 2 cloves), dash of salt & pepper.
  • Whisk together and spoon over cut (open) side of artichokes, so that the oil flows into the nooks and crevices between the leaves.

Heat up your Grill:

  • Place artichoke halves, cut side DOWN, on preheated grill over a medium/high heat. Grill until edges have a nice slight char--about 5-10 minutes.

Serving your Artichoke:

  • You will want a dipping sauce. The simplest is a small bowl of melted butter. You can also whip up the mock aioli sauce below: (I know its not a real aioli but mayonnaise will give you the same basic idea)
    • Tangy Balsamic Aioli:
      •  1/2 cup mayonnaise (do NOT sub miracle whip)
      • 1 Tbs balsamic vinegar
      • 1 Tbs champagne vinegar (sub red wine or apple cider if you don't have this and add a PINCH of sugar)
      • 1 tsp crushed garlic (1 clove)
      • Mix together until well combined, makes 4 servings!

Eating your Artichoke:

  • Remove outer leaves first, dip previously attached end of leaf, scrape "meat" off of leaf with your teeth (this is the fun part for kids), toss leaves into scrap bowl. Repeat & enjoy!
  • When you get to the base of the artichoke there will be a core left, this is the heart of the artichoke and the very best part. Inspect to make sure all of the thistly choke has been removed, cut into pieces, dip and eat!


Monday, June 11, 2012

DIY Food: Pretzel Bites


On our new healthy eating kick, we've been trying to cut out as much processed and junk food as possible. But, sometimes you just have a craving for something-- something starchy, buttery and with really no nutritional value at all. To keep on track (at least sort of) I've decided to allow myself a few treats now and then, as long as I make them MYSELF. This way I'll have to decide if the effort is worth the result and I'll at least be cutting out the obvious bad stuff like hfcs, preservatives, and artificial additives.

This week I've been dying for a pretzel. I LOVE the mall pretzels. I think its probably criminal (or really good marketing) but there is a pretzel shop right outside the one maternity clothing store in the mall. I became addicted to these things during my first pregnancy (when I could only keep down starches) and happily carried on during the second. Now I haven't an excuse like pregnancy but I still crave those darn things.

I saw this post on pinterest a few weeks ago and decided the recipe was simple enough for a yeast beginner to try. It only requires basic pantry ingredients and the 3 solid food eaters in the house give it 2 thumbs up!

Recipe (as adapted from above post): yield approx 50 1x1 bites


1 tsp active dry yeast (1/2 a packet)
3/4 cup warm (not hot!) water
1 tsp honey
2 cups + 1 tbs all purpose flour
3 tbs melted butter
1 tsp salt
1/3 cup baking soda
5 cups water

1. Preheat oven to 450 F.
2.Combine first 3 ingredients in a medium sized mixing bowl. Wait 5 minutes until yeast is active and foamy.
3. Stir in melted butter & salt. Mix in flour. When all ingredients are roughly combined, turn out on counter and knead for 5 minutes until dough is no longer sticky and forms a ball.
4. Place dough back into (cleaned and) oiled mixing bowl. Cover w/towel & allow to rise until doubled (approx 1-2 hours)
5. Turn out dough and divide into 4 even portions. Roll each section by hand into a long snake approximately 1" in diameter (just like with PlayDoh). Cut into 1" lengths with knife or kitchen shears. Repeat with remaining dough sections.
6. Combine baking soda and water in a medium sauce pan and heat until gently boiling. Drop about 10 pretzel bites into water bath. Scoop out with strainer or slotted spoon after about 30 seconds. Place on paper towel to dry.
7. Spread bites out on parchment covered baking sheet and bake for 9-11 minutes -- until golden brown. Check halfway through cooking and rotate tray.
8. Cool on wire rack. Brush additional melted butter over tops of pretzels and dust with Kosher or pretzel salt.  Enjoy!!


For beautiful food photos and a more detailed instruction, see original blog post! If you give this recipe a try, comment below and let me know how it worked out for you!