road

road

Saturday, September 22, 2012

Real Food, Real Easy: Crockpot Chicken Tortilla Soup


As things have gotten a bit busier and more stressful around here with the big guy starting kindergarten and the hubby having been on nights at work,  I admit my meal planning and recipe excitement has suffered quite a bit. There have been a lot of grilled chicken or fish with side of pasta, rice, salad, etc. type of meals and more pick up food than we've had in a good long while as well :(   

Thankfully, my hubby has been back on day shift for 2 weeks now! Its great to be coming out of the restrictions that come as a result of having a partner who sleeps when everyone is awake and away at work when everyone else is sleeping. Even his days off were messed up because his sleep cycles had to be maintained.

Now that he is back on days, I've got to get my act back together!! He doesn't really like to take sandwiches and I don't want to buy him things from boxes so that means that he either has leftovers or premade/prefrozen meals-- either of which he prefers to trying to cobble something together while getting ready in the morning (did I mention he leaves for work at a ridiculous 4:15 am???) Needless to say, I am not up at that time to make him something to take. So all of his food has to be ready the night before and withstand both travel and reheating.

I've been going over some of my favorite convenience foods and sorting out those that can be real food adapted easily and also finding some fun/easy freezer meals & grab and go items to help keep us more on track (and less likely to be picking up the phone to place an order at 5:15.....) So, I'm creating this new category-- its especially for things that either come together very quickly (like 30 min or less) or can be premade & frozen or thrown in the crock pot. 

This particular recipe is one of our long time family favorites. I got the recipe from my bestie and adapted it for my personally picky eating. It's a dish that gets a lot of appreciation as it hits all of the key cooking categories: 1) little to no prep  2) little to no supervision while cooking 3) tastes great   4) adaptable for a variety of tastes/allergies  5) freezes well!  6) high in nutrient density/low in calories.  7) uses mainly pantry staples.


To make this a real food recipe, very few swap outs were needed. For each of the canned items, I am using organic with no added sugar and low or no salt where possible. You can also use your own prepared beans or frozen corn. For the chicken, I am using a free range chicken. This is a great application for some of these tougher free range/pastured meats that do well after cooking on low heat for a long time. Instead of using the packets of pre-prepared taco seasoning, I am using a homemade blend of spices from this recipe. Finally, for the tortilla part-- you can purchase store bought tortilla chips (watch your ingredient lists) or simply fry up a few shreds of corn tortillas you have at home or omit them all together (as we often do).


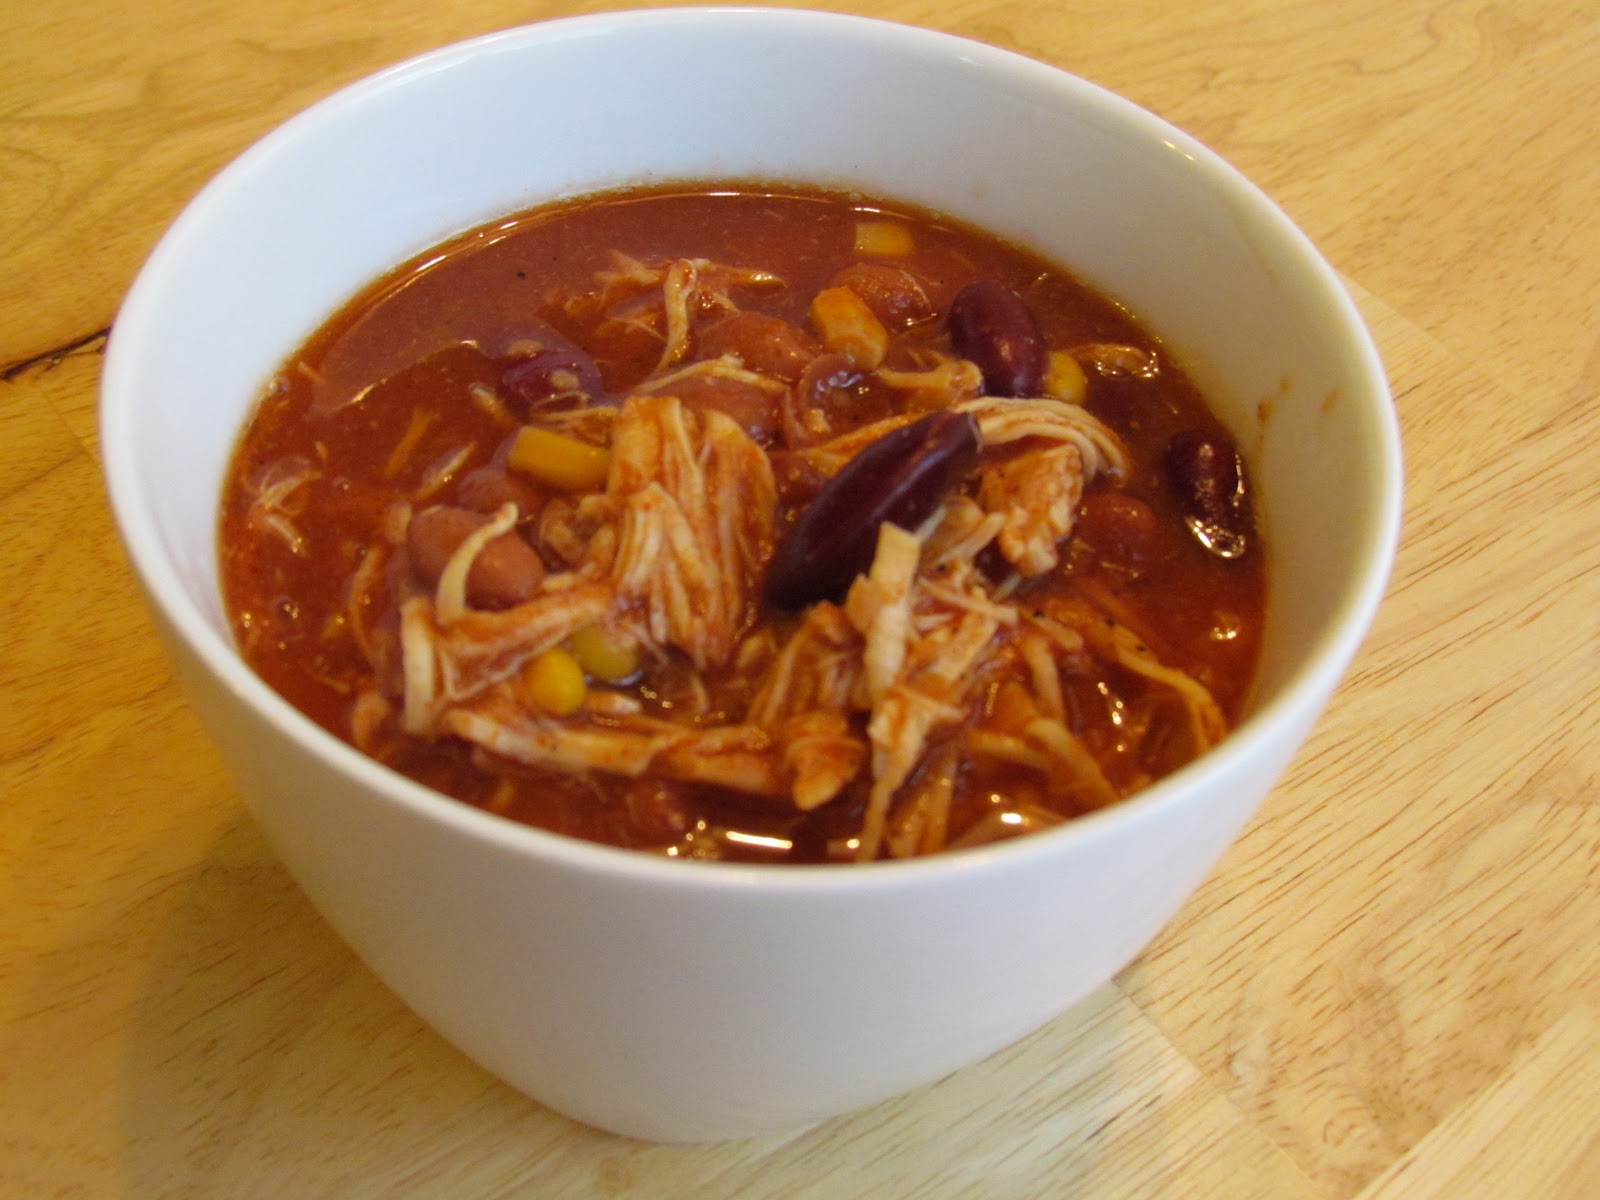
Recipe: Chicken (Tortilla Optional) Soup

1-1 1/2 pounds chicken breasts (still frozen okay!)
1 15 oz can kidney beans
1 15 oz can pinto beans
1 15 oz can whole kernel corn (frozen okay)
1 8-15 oz can tomato sauce
1 packet taco seasoning (or 2 TBS homemade)

Add-ons:
Sour cream
shredded cheese
diced green chilies
tortilla chips or strips

1) Put chicken breasts into crock pot.
2) Open all your cans and dump into pot on top of chicken.
3) Add in seasoning mix. Stir. For a thicker soup, use only those liquids from the canned food. For thinner soup, add water to top off the crockpot.


4) Turn your crockpot on high and walk away for 6 hours.
5) Remove cooked chicken breasts. Using two forks, shred chicken. Return to crockpot. STIR.


6) Serve soup with personal add ons. I like to set up a buffet style bar with shredded cheddar, sour cream, tortilla strips, and diced green chilies.


Leftovers do freeze well or you can strain out the soup solids and make burritos or other dishes with them (like the quesadillas shown below!) to get some distance out of this one dish.


As always, feel free to comment with your thoughts on this recipe!

Click on the like button below to follow us on facebook.


Thursday, September 20, 2012

DIY Fruit Roll ups

And now...... a break from zucchini posts!!!! Yay!!!!!!!!!

As we've been getting pounds and pounds of fruits and veggies in our every-other-week farm box, I admit that I've lost track of some produce from time to time. These are the things I set on the counter to ripen up a bit or put in the fridge and then promptly forgot about. For veggies, this is the kiss of death-- straight to the compost bin for sure! For fruit, not so much. It really depends. Anything short of absolute mold is probably salvageable as an ingredient in something-- bread, muffin, smoothie???

I received my new electric food dehydrator as a gift for mother's day, since then, I've also been experimenting with drying. You'd never believe that picture below represents a big bucket of fruit that most people probably would have sent straight to the bin!


We've especially been over gifted with stone fruit. Plums, plums and more plums. I do like plums but I can only eat so many of them. Also, we've gotten mostly reds and I prefer the black/darker variety--sweeter, less tart. I have worked out a great plum coffee cake/muffin/sweet bread recipe that uses lots of plums but it also has a fair amount of sugar so I can't be making that every week. We do eat the plums out of hand at lunch or for snack but we've also got bananas, pears, apples, oranges, strawberries and usually a melon of some kind as well. So we can't really afford to focus in on just one kind of fruit.

A few weeks ago, I found myself with better than a dozen plums. Some red, some black. Some under-ripe, some over-ripe. There were a few wrinkly peaches as well that had begun mummifying themselves in the back of the fridge. I peeled and chopped the whole lot (being sure to cut out any bad spots) and dumped them into a sauce pan. I added just a few tablespoons of water (less than 1/4 cup) and absolutely nothing else-- no sugar, no pectin, no gelatin! I cooked the mixture on low until the harder, unripened fruit had softened and most (but not all) of the liquid had evaporated. I had a chunky, bubbly, syrupy kind of mix. I took that and dumped the whole thing into my food processor and whirled until it was a smooth, thick liquid.

I poured the liquid onto the special fruit leather trays of my food dehydrator (that I had previously LIGHTLY rubbed with coconut oil). I tipped, swirled and spread the mixture until it was evenly distributed over the tray. Not too thick (but you could if you were going for more fruit leather consistency) and not too thin as it would likely rip too easily. This amount of fruit (approx 12 plums peeled & seeded and 3 peaches) made 2 full trays PLUS a bit of extra puree (that I used as baby food). I set my dehydrator on 135 F and walked away for about 6 hours. Most of it was dry and ready at that time. There were a few spots that had been a tad thicker that took longer to finish. You'll know the fruit is done when you can easily peel it up and the surface looks matte and there are no sticky spots. It should feel leathery.

Dried fruit puree on dehydrator tray

I peeled off the fruit in one giant ring and placed it onto a piece of waxed paper. I opted to divide each ring into 6 portions-- so with 2 trays this equals 12 servings total. I found kitchen scissors to be a fast and easy tool for the job. From there, I simply rolled them up from center out, securing the roll with a small square of transparent tape. I keep these in a zip top baggie in the fridge and so far they've held up beautifully. Barring any exposure to water or other liquids or leaving the bag open for them to get too dried out, I'd expect the shelf life here to be pretty indefinite.

Dried fruit on wax paper. Halve, then divide into thirds.


Leave wax paper on for rolling to minimize sticky problems!

I've since repeated this with a slightly different mix of fruits. This time only maybe 8 or so plums and the rest was extremely mushy, very over-ripe pears. From reading my dehydrator's instruction manual, you can use basically any kind of fruit that has a good amount of pectin in it and it will set up nicely for you with no additives. Not sure about your fruit? Mix it 50/50 with unsweetened, organic apple sauce for extra insurance.

Yes, you absolutely can do this without a food dehydrator. BUT you will need to have an oven that will get below 200 F (or keep the door propped open) and plan to be home ALL day. Because a dehydrator has a fan, the food is getting heat AND air. As most ovens do not have a fan, the overall drying time can be much, much longer-- you may even have to do it over 2 different days!

 The family loves that they get a sweet treat that really looks, feels and tastes like the store bought stuff.  I love that I get to use up dodgy fruit that would (likely) be heading off to the compost bin and I know its been made with 100% fruit and no nasty artificial colors or added sugar!!

Feel free to comment below and let me know if this worked for you!

Click on the like button below to follow us on facebook.

Friday, September 14, 2012

For the Love of Zucchini, Part 4: Muffins!!

I know I haven't been around as much lately-- just busy around here. You'd think with the big guy starting kindergarten, I'd have all this extra time. It just hasn't worked out that way. First I overloaded my to-do list and got a bit bogged down there. Next I got involved in a bunch of procrastination projects that had been put to the side while hubby was working nights (thank goodness that's over!). Finally I've gotten a few extra minutes but -- so classic-- I've ended up with a terrible head cold. Sheesh. Anyways, it's not that I haven't been doing anything or that I didn't want to write. Hopefully I'll manage to get this finished up without sneezing all over the keyboard (again). Perhaps next week we'll work on some homemade sanitizers??

I really thought I was done with all the zucchini several weeks ago but then I was at Trader Joe's and they had packages of small organic zukes that I just couldn't resist! So once again, I was finding ways to eat them up. I ate a few myself, just boiled, buttered and salted (my favorite easy prep) but that left me with 5  that I still needed to use up! I threw one into a crustless quiche that I sometimes make for dinner and then there were 4.

I decided I really needed to make some zucchini bread. But instead of baking it up in large loaves, I like to take these quick breads and turn them into muffins. It's something I've found works well for banana nut bread so I thought I'd give it a try here, as well. It makes the bread into nice, easy-to-grab single servings. Because this is from a quick bread base instead of a muffin base, these are quite a bit denser than a typical muffin (slightly shorter as well, but not stumpy). Think of these more like "mini loaves" instead of muffins and you won't be disappointed!


Spiced Whole Wheat Zucchini Muffins

Since I had so much zucchini, I opted to do 2 batches. I did one as a fairly traditional spice cake flavor and decided to try out chocolate for the other. I'd never done a chocolate zucchini bread before but it ended up being a big hit with the hubby. I also made these with 100% whole wheat flour. I used King Arthur's white whole wheat (which I've started using in my bread baking). It's NOT bleached or lightened in any way, it just comes from a lighter colored white wheat. This gives it a milder, less "branny" kind of flavor. Its definitely my go-to flour of choice right now!

As I converted this recipe (originally from Better Homes & Gardens checkerboard book) to be whole wheat, I had to add some liquid into the recipe to balance the dryness of the fiber. I've opted to do that with unsweetened applesauce. If you use a more traditional whole wheat, you may need to add more liquids or applesauce to get the batter to the proper consistency. If you use a white (not whole wheat) all purpose typical flour, omit the applesauce all together. Also, be sure to drain your zucchini well before adding it to the batter!

Chocolate Whole Wheat Zucchini Muffins

We ate a few of the finished muffins, then I set them out on baking sheets to freeze individually overnight. I'm storing them in the freezer in a large gallon ziptop baggie. This has worked amazingly well to keep the muffins from sticking together. I've been sending one to school with the little dude for snack time and as I've been sending them frozen, they've managed to hold together long enough for him to eat (at least according to him...).

If you don't have enough zucchini to do both kinds but want to try them both out, the base is the same for each. Simply omit the spices (cinnamon, nutmeg/cocoa) during mixing. Separate the batter in half and then add the respective spices to each batch (remember to halve the amounts!).

Version 1: Whole Wheat Zucchini Bread-Muffins (yield 12 muffins)

1 1/2 cups white whole wheat (see note above)
1 tsp ground cinnamon
1/4 tsp ground nutmeg
1/2 tsp baking soda
1/4 tsp baking powder
1/4 tsp salt
1 cup sugar
1 cup finely shredded, unpeeled zucchini (about 2 small)
1/4 cup cooking oil (I used refined coconut oil)
1 egg
1/2 cup unsweetened applesauce
1/2 cup chopped walnuts (optional)

1) Grease or line all 12 standard size muffin cups. (Silicon liners need not be greased) Preheat oven to 350 F.
2) Combine dry ingredients (flour, spices, baking soda, baking powder). Set aside
3) In a medium mixing bowl combine sugar, zucchini, oil, applesauce & egg-- mix well.
4) Add dry mixture to zucchini mixture. Stir until just moistened. Fold in nuts (if using)
5) Spoon batter into prepared cups. Fill approximately 2/3 full.
6) Bake at 350 for 25-30 minutes (wooden toothpick inserted in center should come out clean).
7) Cool on a wire rack. Remove liners if using silicon. Keeps in a sealed container for 2-3 days (in refrigerator) or freeze individually.


Version 2: Whole Wheat Chocolate Zucchini Bread-Muffins

Follow directions in above recipe EXCEPT:

1) Omit cinnamon & nutmeg
2) Add 1/3 cup unsweetened cocoa powder. (This will be lightly chocolate flavored, feel free to increase this if you LOVE chocolate)
3) Optional add in: 1/2 cup chocolate chips. (I didn't do this the first time but probably will the next time, to up the chocolate factor!)

Mix and cook as directed above!!


Feel free to comment below and let me know if you liked this recipe or thought it was interesting or had a suggestion!!

Click the "like" button to follow us on facebook (I promise not to clog up your newsfeed with lots of junk!)


Monday, September 3, 2012

Simple Swaps: No more cooking spray!

So when we started down this real food path, I admit I didn't throw out all the bad stuff right away. We mostly just ate through it and replaced it with healthier options. Regular pasta was replaced with whole wheat, white rice was replaced with brown, etc. However, every once in awhile I find something which just doesn't translate very easily into a real food. Sometimes I just choose to do without, sometimes I work to find an alternative.


One of the least natural items we used to use in our kitchen on a daily basis was cooking spray. You know the stuff. Smells like c**p but makes everything glide right off your cookware. The problem is its a completely manufactured substance. Even if you get an "all natural" or organic version, there is still the issue of the propellant. I prefer my food to have less additives and its kind of hippocritical to use processed cooking spray to prepare my locally grown, organic produce or grass fed meat!

So, about a month or so ago, we finally used up the last little bit of cooking spray and have been doing without since then. You know what? I actually haven't missed it at all. I think my hubby (who is always looking for the short cut) has missed it more than me.

So what do we use instead? It depends on the project.

For Baking:
This morning I had 2 bananas desperately in need of being used up before they turned to complete mush. So I did the sensible thing and made banana nut muffins for breakfast! Instead of spraying down my muffin pan, I simply slipped in one of these easy silicone baking cups. The big advantage of these is that you can put things into them that (even with spray) would never release from a muffin pan... like whole eggs. The other nice thing about these cups is that you can remove them after the muffins cool and then store your extra muffins in a baggie in the freezer without worrying that paper liners will get soggy and bond to the muffin itself (I had that happen once). And, in a pinch, you can even bake stuff in them WITHOUT the pan-- although I've never been brave enough to try it!

What about cakes or other larger baking projects? Go old school! Butter, it's my friend, it's your friend!


For baking things like cookies or fries that you might not want to add any extra butter or oil to, consider a silpat mat. They are flexible mats made of silcone that come in various sizes that fit most baking sheet pans. Anywhere you might want to spray or use parchment paper would be a good place for a silpat. Since they are silicone, nothing sticks to them. I actually use mine pretty regularly but I especially give it a workout at Christmas time when I'm doing alot of candy making. I pour my molten peanut brittle over it directly and when its cool, it peels right off without having to have a buttery residue!

 
For Skillet cooking:
Butter is your friend here as well. I used to cook my breakfast egg(s) in a pan slicked with cooking spray. Now, I throw a small pat of butter in there and enjoy the extra flavor!
 
For Skillet Frying:
For things that I don't want a buttery flavor for (like searing meat) I have loaded up my refined coconut oil into a simple oil dispenser that I actually found at the Dollar Store. One buck and I've got an easy way of getting a teaspoon or two of oil into a pan with no fuss and no muss!
 
More direct replacements:
 
1) Misto. This is an ingenious device that allows you to load up your cooking oil of choice (I like olive oil as an all purpose oil due to the tendency of coconut oil to seize up in cold weather). A few pumps of the top and you've pressurized it enough to actually make your oil into an aerosol. By far the closest and easiest replacement. The only downside is that it's a little expensive-- I've seen cheap ones for as little as $9.99 and typically they run more like $14.99.  We currently have one of these and it does work great. Ours is currently filled with lemon juice that the hubby is using to baste meats on the barbecue. We'll probably eventually (when grilling season is over) dump that out and put in some oil.
 
 
2) DIY. I have seen on Pinterest, several posts on making your own cooking sprays using a simple trigger sprayer (which cost like a dollar at Walmart). I have given this a try but haven't had 100% success with it. For me, it does coat okay. For Hubby (who likes to use it on the grill to keep meat from sticking) he doesn't think it coats enough. Also many of the techniques have you add water. I've found that even with keeping it in the fridge that the water started to get cloudy after a week or so. While its probably nothing, I feel the need to dump it out. That is a waste of perfectly good oil and kind of annoying. One other thing to think about is the fact that these cheapy sprayers are not typically made with food grade plastics. Just something to be aware of. Check out the website in the pic below for a how to tutorial if you want to give it a try. (She also has lots of other good green housekeeping tips!)