road

road

Sunday, August 25, 2013

Sewing Project: Foldable Lunch Sack

So after I finished the last blog entry, I was feeling all ready for school. Then, as I was setting up both boys' backpacks I had a "doh",  forehead smacking moment-- the super cute fire truck lunch box I had gotten for my preschooler didn't actually fit in his tiny preschool backpack. Oops!!  His backpack is a cute hand-me-down from brother that has Elmo and is sized just perfectly for preschool-- it will just fit his snack and his spare set of clothes. Unfortunately the full size lunch box was just too much for it!

Last year, he started part way through the school year and I never got around to getting him an "official" lunch box. Since he only takes a snack at school, we don't need anything really big, so we mostly were using a cheapy sack that I think had originally come in a Subway kids meal. I really wanted him to have something a little better this year (and something new too, since his backpack wasn't being replaced). Since the new lunch box was a bust, I decided I'd just whip something up. As I wasn't working through anyone else's tutorial or pattern, I had a bit of trial and error here but I think, in the end, it worked out pretty well!


I opted to use a Sesame themed fabric (to go with the backpack) but obviously you could pick anything here--- simple solids or fun checks, or how about the popular chevrons? The fabric stores (even in Wal-Mart) also have plenty of branded fabrics featuring other popular characters (Dora, Mickey, etc) as well as professional sports teams.  You could also go super feminine for yourself -- if I needed a lunch sack, I'd do one in a lovely floral with pink trim.


Sewing Tutorial: Foldable Lunch Sack


Materials List:

1/2 yard main body fabric (this is more than you'll need but will allow for pattern matching-- if you go for a solid, you'll only need 1/4 yard)

1/4 yard nylon (basic windbreaker type material-- any color, I used white-- this helps to increase the water/moisture resistance of the fabric and makes it possible to wipe up many spills with a damp cloth)

1/4 yard stiff, iron on (fusible) interfacing (I have a super craft weight that I love)

1 package of single fold bias tape (4yd & 1/2 in wide) in coordinating color

matching thread

5" of hook and loop tape (velcro) -- sew-in style NOT adhesive!!!

Equipment: basic sewing machine, iron


Directions:

1) From your main fabric, cut 2 pieces 7" x 11" (piece A) & 2 pieces 5"x 9" (piece B), the short sides are the top & bottom, so make sure to be aware of patterns and directionality!!  Also cut 1 piece 4 1/2 x 7 (piece C) -- the long sides are the top & bottom for that one.


2) Cut 2 pieces 7" x 11" ,  2 pieces 5" x 9" and one piece 4 1/2" x 7" out of your nylon.

3) Cut 2 pieces 7" x 11" out of interfacing.

4) Following the manufacturer's instructions, fuse your interfacing to the WRONG sides of your main body fabric (do not get your nylon anywhere near the iron or you will have a melty mess on your hands!!)

I know this shows a margin but after I finished, I found that it would be better with a full width of interfacing.

5) Line up one piece A of main fabric with its matching piece A of nylon, RIGHT sides together. Sew a seam with a 1/2" seam allowance across the TOP of the fabrics. Turn fabrics right ways out and use your fingers to press the seam. Top stitch across the top, approximately 1/4" inch from the top seam.  Repeat with 2nd set of A pieces.


I actually did the top stitching later on but it was a real pain to work around seams.
 So, even though you see pins here and elsewhere, go ahead and do the top stitching now.

6) Line up one piece B of main fabric with its matching piece B of nylon, RIGHT sides together-- repeat as above in step 5 for both pieces.

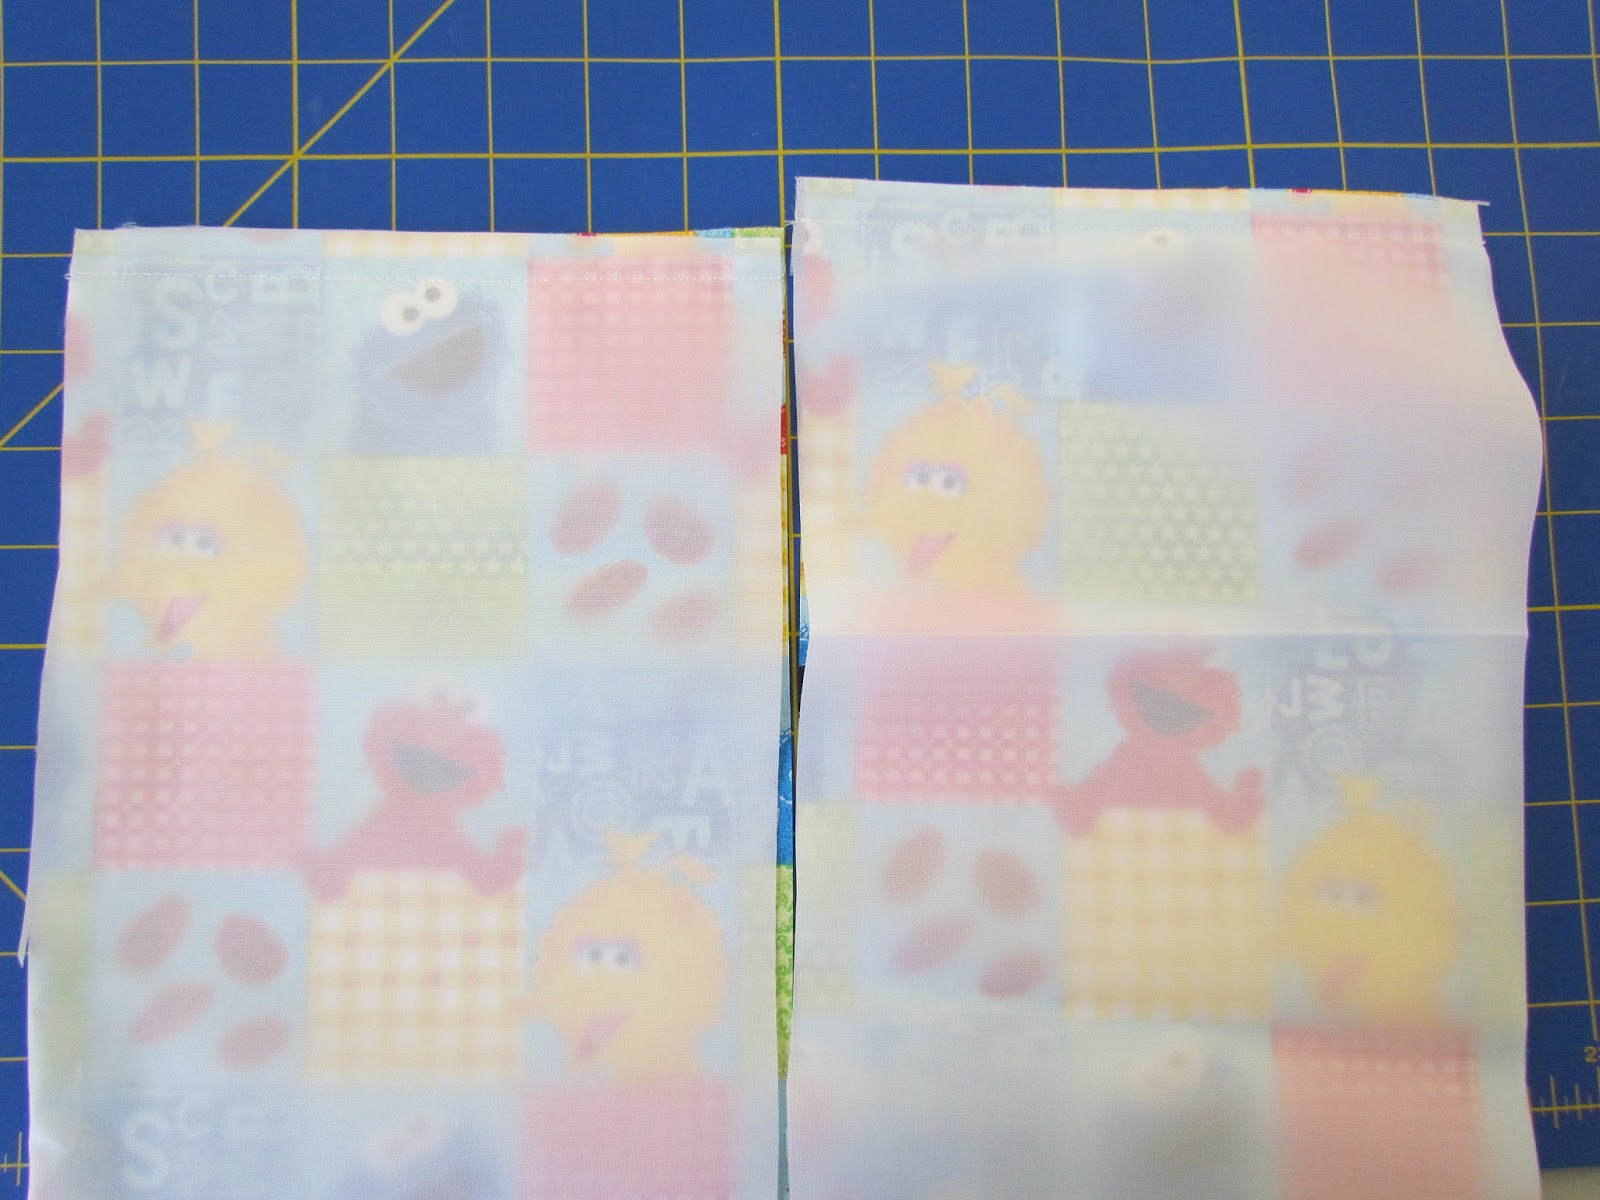
7) Take both finished piece A sets and turn so right fabrics are facing together, nylon to nylon and main fabric to main fabric. Sew a 1/2" seam for each end. This will make a kind of long tube. Turn right sides out and finger press.


8) From your bottom seam, measure out approx. 2 inches & mark with a pin on both sides. Gently crease along this line -- a ruler or straight edge of a table might help to keep it even.


9) Take one piece B set and line up the top seams with the front & back edges of your bag. Moving carefully, match up edges , with nylon meeting nylon/insides together. You may have little bits dangling at the bottom corners, don't worry about that right now! Just make sure that the fabrics are lined up as smoothly as possible, with no wrinkles or folds.


10) Stitch along this edge, using a 1/4 inch seam allowance. Go slowly and carefully and be sure to catch all layers of fabric. It will take some finessing along the bottom corners, just keep stopping and realigning as necessary. Be sure to reinforce the beginning and ending of this stitching by reversing!!


11) Repeat for other side.

12) Trim seam allowance to just under 1/4 inch.


13) We will make the top flap now-- Sew together the main fabric piece C with its matching nylon-- RIGHT sides together, both TOP and BOTTOM, using a 1/4" seam allowance. Turn fabric tube right side out and finger press both seams. Ensure that width of flap matches your bag width or is slightly wider.


14) To attach flap, line up top seam of flap with top seam of backside of bag. They will only overlap for approx. 1/4". Sew right down the middle of this overlap area to secure the flap. WATCH your patterns here --remember that the bag back and flap will be going in OPPOSITE directions. Double check before sewing or your flap will end up being upside down! Trim flap to match bag width.


Inside view of flap attachment. Trim after this.
Inside view of sack-- note all seams are finished!

15) Measure and cut enough bias tape to go from front edge of lunch sack around the bottom and up the back to the end of the flap TWICE + 2 " (approx. 24").  Cut in half.  Open the folds of one end on each piece. Keeping right sides together, line up tape (right side toward right side of fabric) with raw edge of side seam. Start at front edge of sack and go all the way to the end of the flap. Do this for both sides, making a sandwich.


16) Stitch along small fold closest to seam. Be sure to catch all the layers of the fabric!

17) At front edge of lunch sack, sew a small seam across cut edges of bias tape as close as possible to sack WITHOUT touching the sack. Trim to 1/4" inch.


18) Return bias tape to its natural fold. This should make an enclosure for the raw seam on the side of your sack. Pin together.

19) Repeat steps 15-18 for the other side.

20) Measure and cut enough bias tape to go around entire lower flap edge + 2" (approx. 16"). Open bias tape and sew a seam (right sides together) to make a loop that is the EXACT width of your flap. Trim seam to 1/4 inch. Place the unfolded loop with right sides in over the flap edge. Sew along small fold closest to edge. Be sure to reinforce beginning and ending stitches.
Forgot to take a picture, sorry! This is how to line up the new piece of bias tape (in grey, transparent here to see the bottom layers) in relation to the ends of the previous pieces. Stitch along black line. 

21) Return bias tape to its natural fold. This should enclose edge of flap + cut ends of bias tape from sides.

22) Top stitch 1/8" from edge around the entire sack to close up bias tape.


23) Close lunch sack and determine placement for hook and loop enclosure. Cut approx. 2 inches (or personal preference!) . Sew hook side onto flap and loop side onto sack. Pin and double check alignment before stitching! You can either sew a straight line 1/8" inside edge of tape OR zigzag the edges.


24) Open flap, fold bottom of lunch sack towards flap, fold over again. Mark placement of second piece of LOOP ONLY on new location (if you want it to be secured in the folded position!). Attach new piece of loop.


You are done! Marvel at your handiwork!

This should be completely washable but the more you run it through the machine, the softer the interfacing will become. Also, I wouldn't recommend drying it in the dryer as the nylon could be sensitive to excess heat! For the most part, the nylon should make it easy to wipe up/sponge off any spills. If you really need it to be fully washable/dryable, consider subbing in a cotton canvas material for the nylon. It will also provide a decent moisture barrier but isn't temperature fussy!

As an aside, this project cost me a sum total of $3.50!!  I bought the Sesame fabric for $2.50 (10 a yard @ .5 yards and a 50% off coupon at JoAnns and the bias tape for $1.99 and a 50% off coupon at JoAnns . The nylon and interfacing were leftovers from a previous project. If you are buying new, this will add about $2 to your total-- so expect to spend between $5-10 depending on coupon use, sales, etc.

As always, feel free to ask questions or comment on the project! If you like what you see, "like" us to add us to your Facebook feed!


Monday, August 12, 2013

Getting the Most Out of Your Back-To-School Supply Shopping

So, its getting to be that time of year again! I don't know about your area but school actually starts THIS WEEK out here! EEEEEEEEEEEK!

I think we are pretty much ready. Junior is totally excited. He's going to be a big 1st grader this year and feels like he has it all handled. I still get a little nervous though-- he's still my baby after all! The best I can hope to do is get us as ready as possible.

Here's a run down of our program-- granted we aren't super experienced as grade-school parents -- but it also includes some suggestions based on my experiences from when I was a teacher.

Basic Equipment:

You've gotta have a bag! We've gotten a new backpack this year-- not something we actually do every year but his old one died a sad and tragic death about a month before the end of school after 3 YEARS of faithful service. I think I got my $15 worth out of that! His old one had a character design (Handy Manny if that helps you date it....) that he originally picked out for our first Mommy & Me class at the park (kind of a pre-preschool type of thing). We opted to replace it this year with a nice solid color Jansport. I'm hoping that going for a quality manufacturer will let this one last a good 2 (or 3 or more!) years.

While there were many character themed packs at the assorted 'Marts in our area, I deliberately limited the selection to a "generic" type of pack. Assuming your kids are like mine -- who knows what shows/toys/games they will be into next year and what will be "too baby-ish". I actually found a decent price online (Amazon) in a basic blue that cost me just over $20.  We found similar ones at our local Ross for a similar price. You can often find higher quality packs at discount stores like Ross, Marshalls, TJ Maxx, etc. that have surplus styles, colors or discontinued patterns of good packs that just didn't sell originally. Spending a little bit more now, to have something that lasts longer, will save you over the long term!


Now for the lunchbox-- this is something that he does get every year. Besides letting him have something fun and personal to take to school, the day to day wear on these things tends to end their lives after about a year anyways. This year-- its Scooby-Doo. Its soooo cute too! He picked one that actually looks like the Mystery Machine that the gang all rides around in. Fun! The $12 is totally worth it when you consider that he'll be taking his lunch to school EVERY day. We do not buy school lunches. I have strong feelings about what they serve, as well as the cost. Unless you are getting the completely free or extremely reduced rates, it is almost guaranteed to be cheaper to buy your own supplies to pack lunches. And honestly, it really is less hassle than trying to make sure they have enough money, are making good choices, etc.


Pens, Pencils, Etc.

For our kiddo, all I'm getting is a new box of crayons, a set of colored pencils and one pack of markers. We have left over construction paper from last year as well as lined paper.  And, after a year's worth of birthday goody-bags, stocking stuffers, prizes, etc. he will probably NOT need a pencil for another 2 years! He is also set on erasers :P 

At this age, unless specifically requested, I'm not going to bother with a 3 ring notebook. Even up to high school, you are probably better off waiting until the first week. You might have teachers who would prefer that your student has a separate (smaller) binder for their class rather than one of those ginormous oversized deals that everything is supposed to fit into. We do have a simple paper folder (for homework) ready to go, though! Since those tend to wear out pretty fast (I think we went through 3 of them last year?) I'll get them now while I can get them for under $1.

That brings me to the "class list". At our school, the teacher puts out a class list of supplies. But they aren't required supplies for each student to bring, they are instead general class supplies for all the students to share (that are typically donated by the parents). This is a great time to stock up on these items. Pencils, pens, erasers, crayons, markers (esp. dry erase), lined paper, copy paper, construction paper are all items commonly found on this list. If your school is the same, and you like to help out, keep this in mind when you spy boxes of crayons for .25! When I'm buying to donate to the class, I like getting TWICE as much as I plan to give -- because in the spring term many of the classes will be low on supplies again but there won't be any sales. Being willing to set this aside for a few months will make you a hero to your kid's teacher in the spring and will really save the dollars, too!

Pencil Cases:

I LOOOOOOOOOOOOVE pencil cases. The zippered pouch style in particular. Not for pencils, necessarily. But I actually have a number of uses that they fulfill around the house. And right now, basic models can generally be found for $1-2!!


1) Games/small electronics: Junior's hand held game system fits easily into a larger 3 ring binder sized zipper pouch-- it also has 2 side pockets, one fits the games and one fits the travel cord perfectly. It cost us about $4 where the custom fitted name brand case cost $30. After a year + of use, its still doing the job wonderfully!

2) Purse organization: In my purse are several of these large zippered pouches. Instead of loose things flying all over my purse, I use each as a mini compartment. One is holding coupons, flyers, & gift cards. Another holds kid stuff (a small box of crayons, a mini coloring book, etc) to keep the littles occupied during long waits (spectacularly useful at restaurants!). This could also be great if you use the "envelope system" of finances to keep your envelopes neat and tidy. Smaller pouches are good for storing make-up and feminine products.

3) Tiny diaper bag: The 3rd pouch in my purse is actually serving as a tiny diaper bag. It fits 2-3 diapers, a travel pack of wipes and a bottle of hand sanitizer. Perfect for changes on the go. No need to carry a separate diaper bag everywhere! Now I can just leave it in the car for absolute emergencies.

Sorry for the ramble! I'm hoping something here might be useful to other people. If you have your own tip you'd like to share, please feel free to post in the comments below. I'd love to hear additional ideas!

Click the like button below to add us to your Facebook newsfeed!