road

road

Sunday, July 8, 2012

Sunday Savings Tip: Bye, Bye, Papertowels!

As I experimented with cloth diapering a few years ago, I was introduced to the whole paperfree community. I learned that every disposable item in our house, even toilet paper (!) can be replaced with cloth. While I'm not quite ready for bathroom stuff, I know there are plenty of other places where I could switch out cloth for paper.

As a simple beginning step, I stopped buying paper plates. I know they are completely unnecessary but I often bought them anyways to save on dishwashing (which I hate with a passion). A second simple swap is hankies. Not necessarily for everyone in the family, but for me. I bought 3 really cute vintage hankies that reminded me of the ones I used to take to elementary school (before pocket tissue packs were invented).  I keep them tucked in a zippered coin purse in my bag and ready for quick nose wipes, crying cleanups, etc. Since I have several, its not a big deal if I don't get to washing the dirty one or forget to get the clean one back into my purse right away.

I've been working up to tackling our biggest paper consuming room-- the kitchen! With a few basic supplies from my local mart-type store, I now have a convenient and tidy clean up center that uses cloth instead of paper towels, without too much fuss or inconvenience. Because we all KNOW that if it isn't easy, people won't use it or stick with it!

I know many of you are saying-- well, why doesn't she just use a kitchen/dish towel for clean up? I have a 5 year old, a 2 year old and a dog. There are just some things that once you clean them up, you can't reuse that towel without washing. I do have a half dozen nice kitchen towels but I am hesitant to use them to wipe down counters or clean up spills with them, knowing they are likely to be permanently stained.

Here is my simple plan:

2 packages ($3.48 ea Wal-Mart) of 9, kitchen utility towels
1 pair of scissors
1 plastic shoe box ($.97 Wal-Mart)
1 small plastic trash can ($4.88 Wal-Mart)


By cutting the utility towels in half, they fit perfectly in the shoe box. That also happens to be the same size of the smallest towel in the select-a-size brand paper towels we've been using, so it feels familiar. I don't plan on hemming the cut edge of the terry towels unless they start to fray too much. For right now, I'm just going to see how they hold up. I picked a nice basic beige to hide a plethora of stains (and it is a nice a neutral as well). One package of 9 towels becomes 18 and actually fills the box to the top. That means I'll have a set to use and one to wash.


The shoe box fits right behind the kitchen spigot for handy dispensing. The trash can is on the shelf right above the garbage, so its close to where the throw away impulse is likely to take people.

So far, this has been working great. We still had about 1/2 a roll of paper towel a week ago when I set this up and its still about 1/3 filled. The towelette bin isn't completely emptied out, we've been averaging about 2 a day. I'm finding myself using each towelette several times-- once to dry a dish, once to dry some hands, once to wipe a face and/or once to clean/dry the counter and then toss it.

We all know its better for the environment, but it also helps the wallet when you don't have to keep buying items to replace those that have been used once and thrown out. For my initial "start-up" costs of about $18, I can expect the savings to be returned to me in 1-2 months of not buying more paper towels. You could easily cut costs further by only purchasing one set of towels and washing more frequently and just hanging a simple plastic grocery sack for the laundry bin. That would take the cost of the project down to under $5. That's a winner in my book!

Comment below and let me know what you think! Is this something you could see yourself doing? Do you do something like this already?

Click the "like" button below to follow us on Facebook!

Saturday, July 7, 2012

Homemade PLAIN Granola

Peaches & Cream Parfait with Homemade Granola

As far as fast food treats go, McDonald's fruit and yogurt parfaits have been a favorite of mine for years. I liked that it was basic stuff-- fruit, lowfat yogurt and granola. It also had only a few Weight Watcher's program points which made it a reasonable choice for a drive thru breakfast or mid-afternoon snack. The part I liked best about it was the tiny little packet of granola you got to stir in before eating. It added a nice crunch and touch of sweetness (which is helpful when the berries are particularly tart).

When I went looking for a store bought granola that would be similar to the one they serve at McD's, for my own homemade parfaits, I ended up completely stumped. Most granolas had added dried fruit, nuts or coconut and an ingredient list that seemed unnecessarily long.

It became clear, very quickly, that I would have to make what I wanted myself. After testing several recipes over the last few months, I have finally found a great recipe for just plain granola. Its pretty simple and will give you fairly consistent, good results. If you leave it big pieces, you'll get unshaped crunchy granola bars. If you break it up, you'll get a great basic granola you can use as a topping or breakfast cereal with milk.

As this is completely and perfectly plain, it does lend itself quite readily to custom blends. If you are looking for something more, just add in a 1/4-1/2 cup of almonds, raisins, dried blueberries or cranberries, walnuts, sunflower seeds, flax seeds, shredded coconut, etc. Basically the only limit is your imagination!!

Kept in an airtight container, this granola will last up to 2 weeks. If you do add dried fruit pieces or nuts, you may want to consider keeping it in the refrigerator. I have also heard that it will keep indefinitely if you keep it in the freezer but I have not tried that myself.

This recipe was adapted from the one I found on this website.


Recipe: Plain Granola

2 cups rolled oats
1/2 tsp cinnamon
3 Tbs. canola or other light flavored oil
1/4 cup honey
1/4 cup packed light brown sugar
1 tsp. vanilla extract

1) In a large mixing bowl, whisk together the oil, honey, brown sugar, cinnamon and vanilla.
2) Stir in oats until well coated.


3) Spread on a pan lined with silcone mat or parchment paper.
4) Bake at 325 F for 10 minutes. Stir (edges will tend to brown first). Mix will look very wet as its cooking.
5) Bake for 10 more minutes, stirring at 5 minute intervals until golden brown.

6) Cool on baking sheet. Break up into large pieces for granola bars or put into a baggie and crush for crumbled topping/cereal.

Freeform Granola Bars
Granola Crumbles

7) Store in an airtight container!


Comment below and let me know how this worked out for you! Did you leave it plain or fancy it up a bit??


Monday, July 2, 2012

Pinned It! : Waffle Hashbrowns

So I've been skimming Pinterest for some time now and I've gotten some really great ideas for practical projects, some common sense solutions (why didn't I think of that?) and some really awesome inspirational photos to keep me motivated! I've especially been living on the food boards, looking for new ideas in the kitchen!

I tried no less than 3 different cooking ideas I saw as pins on Pinterest last week. First was a totally quick food project for the 5 year old's preschool 4th of July party-- which I had forgotten about until 8 pm the night before. I had to make do with what was in the pantry. Thankfully, I found this pin and was able to more or less get something similar that we could bring the next day.


Memorial Day Pretzels by www.cupcakesandcashmere.com

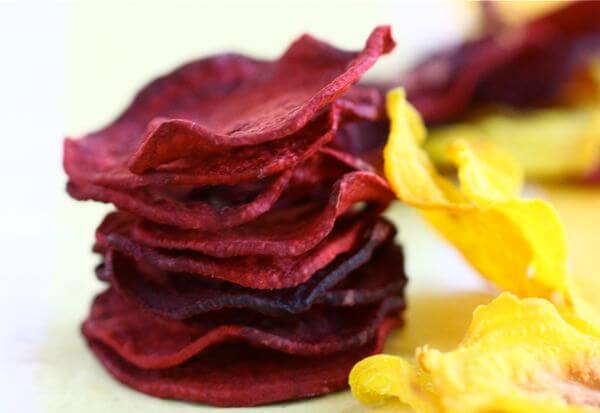
Item number 2 was this pin that I was very excited about as I've had 3 beets hanging around the fridge for a week from our last farm box delivery. I've never eaten a beet that didn't come out of a can before (and can I say ewwww!). I was hoping that making chips our of them would take away some of the fear of the unknown for me. I even bought a new mandoline slicer just for the job ($20 @ Target!). They looked great going into the oven but they were a TOTAL FAIL!!! Half of each chip was getting too brown and the other half wasn't crisping. I ended up with a mix of overdone and underdone chips (with about 3 actual chips being done correctly). I think I might have sliced too thinly or perhaps too unevenly?

Baked Beet Chips by http://acozykitchen.com


Last night was pin #3. I saw this pin several weeks ago-- sometime before Father's day I know because I was thinking of doing these for Hubby. But, I made him a chocolate cinnamon roll from SmittenKitchen instead. I've been thinking about this since then but it seems like too much effort for breakfast (I really don't like anything more complicated than microwaving or toasting in the morning). So, yesterday when we were looking for a sidedish to go with our burgers (with homemade whole wheat buns but that's another post...) I thought it might be a good time to give this a try.


Waffle Maker Hash Browns by http://www.justgetoffyourbuttandbake.com

Overall, I thought it was a success. I spread my shredded potatoes fairly thin-- the Hubs likes his hash browns more crispy than not. The results were nice mix of brown crisp squares and soft white shreds. I used 3 medium potatoes and got 4 not quite waffle sized patties. I only sprayed some oil on before the first batch and there was NO sticking what-so-ever! If you have a well-seasoned waffle maker, you can probably go with no oil at all.

My Waffle Hash Browns (about 1/2 way done cooking...)


We all agreed that it worked pretty well. Since I have a very small waffle maker, it did take some time as each person's patty had to be cooked individually. But I really liked that I didn't have to stand and supervise a tempermental pan of hot oil (and clean up the inevitable mess afterwards). I would definitely try this idea again but I think I would instead try a larger portion of potato, cooked longer. I'd also like to try a mix of vegetables-- I think sweet potato could be interesting here and I have a zucchini patty recipe that uses shredded squash and onion and I think mixing that with the potato (or on its own) would be worth trying. I'll let you know how it goes!!

Anyone else try something they saw on Pinterest recently?? Comment below!